Our Raised Beds

Monday, April 30, 2012
I get a lot of questions on how we constructed our raised beds. I am not the gardener in the family but I did help with building of them so I'll do my best to explain how it was done. Everyone's garden needs are different so this is not a DIY, but will hopefully give you some ideas and answer any questions that you may have about our gardens.


We chose to garden in raised beds for a number of reasons including the fact that our soil isn't great, we have flood irrigation, and it's easier on our backs. We have two beds. One constructed of redwood and the other of pine. The redwood holds up better (and looks gorgeous) but the pine for the second bed was cheaper so we went with it. 


We will soon have a third garden (as seen below). Remember that ridiculously wonky, stapled together chicken coop that we bought for the new girls? It's absolutely useless to use as a coop so we are going to take out some of the doors and windows and plant gourds in there. Our hope is that the gourds will grow up, around, and over the coop. Not sure if it will work but it will be super cool if it does.


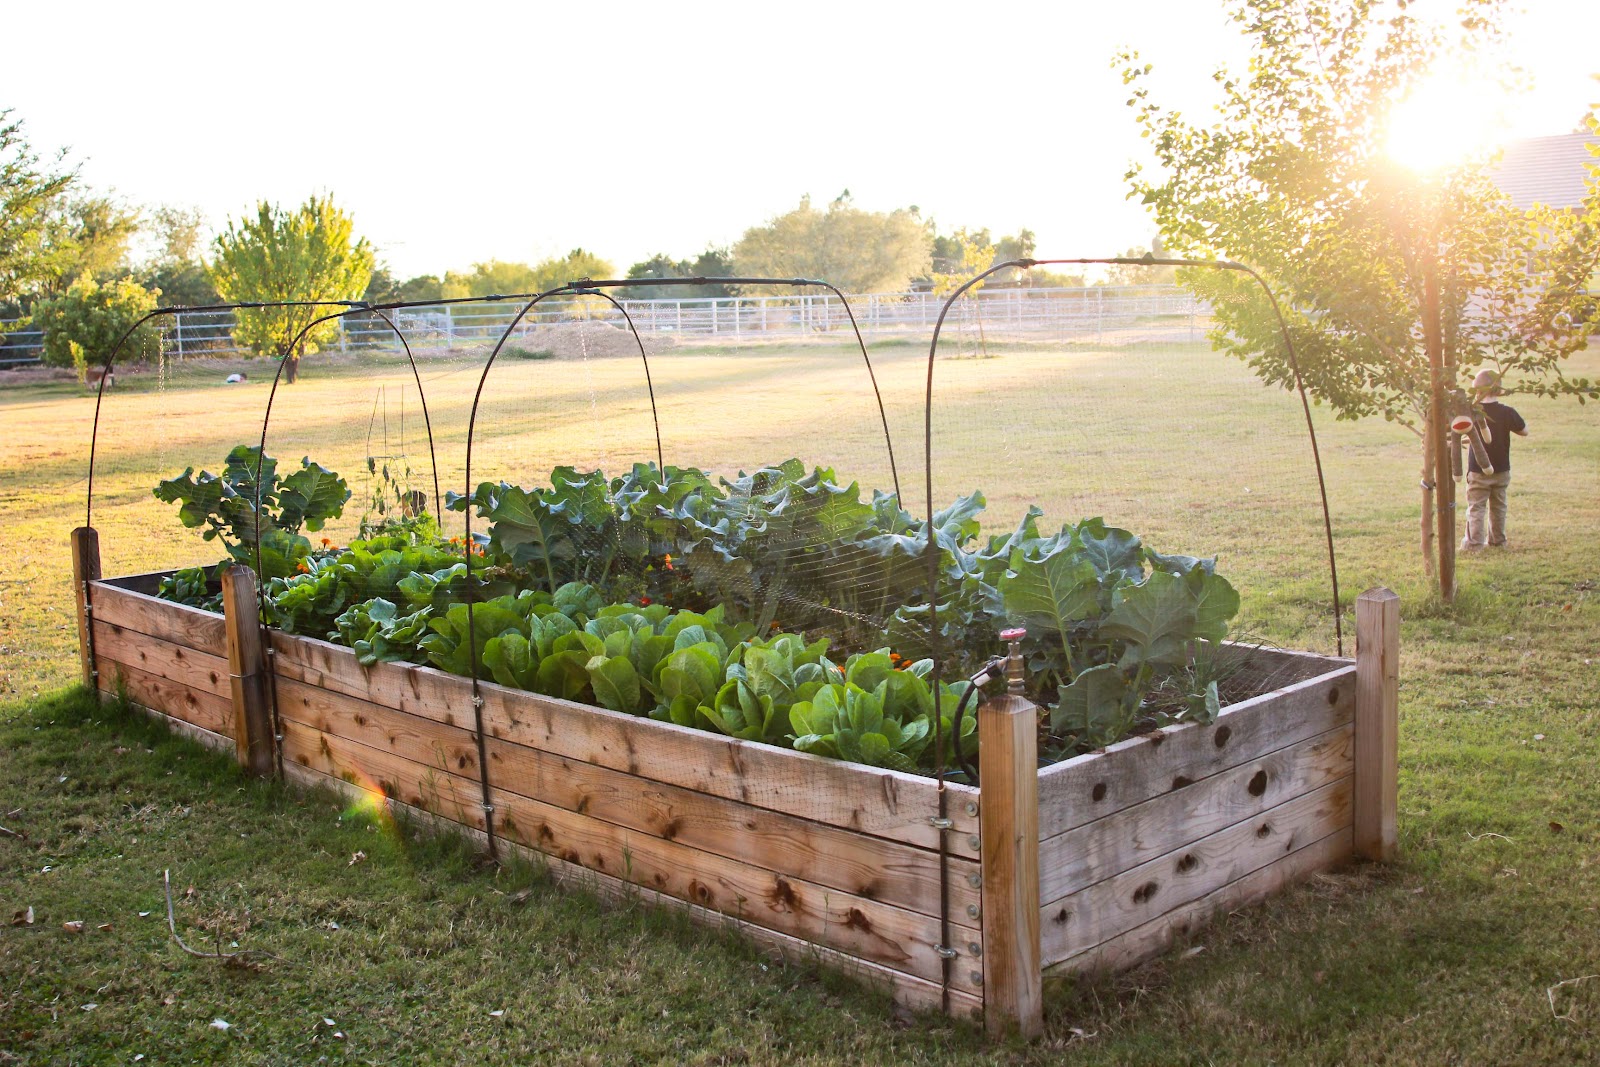
Anyhow, each of our raised beds are built from (4) 2x6's on each side with wooden posts on each end and in the middle (6 posts total for each bed). 


We have 4 pieces of rebar secured to the sides of the garden and running over the top of each bed. A few people have asked me if it's a watering system - it's not. We use the rebar as a way to hold up the netting to keep the chickens and dogs out and as a place for us to hang our shade cloth in the summer (which we have just put up for the season) and our freeze cloth in the winter.


For our soil, we bought truckloads of organic compost from Singh Farms in Scottsdale. I can't recommend this place enough for local friends. It is a hidden gem! Since our gardens are fairly high and large, we secured the sides so they don't blow out. We took metal cable and secured it around the two posts in the middle of each bed.


For watering, we dug a small trench from the closest water source and ran pipe to each garden. We have drip irrigation tubing snaking through the gardens and have it set on a timer. We don't have to worry about the watering much except when it gets too hot - then we just increase our watering times.


As you can see, the chickens are constantly hanging around the garden so it's essential for us to have netting in place to keep them out. The netting is available at local hardware stores and really, it's hardly noticeable (you can see it in the photo above). We have small little hooks screwed around the beds to secure the netting in place at the bottom - otherwise the girls would squeeze their way up and in.


The gardens are a real labor of love and my mom spends countless hours out there each week tending to them and cultivating them. Her efforts are greatly appreciated as we have fresh veggies, herbs, and flowers daily.


Hopefully this answers some of your questions about our gardens. If not, let me know!

What He Wore: BOY style

Thursday, April 26, 2012

A couple of weeks ago, a photographer friend of mine posted about a new line of boys' clothing that had just launched called AVEN. I am always on the search for cool, unique boys' clothing and I instantly fell in love when I checked out the website


AVEN is a result of the combined vision of Angie Monson and Mitch Harris. Angie's background as an amazingly talented family photographer and Mitch's background in fashion design are the perfect match. Since the establishment of AVEN, Angie and Mitch have sought to bring an edgy, unique, street style for young boys. They've definitely succeeded.


All of the clothing is beautifully constructed in the USA and is designed with a stellar attention to the smallest details. Absolutely fabulous. I'm especially loving the plaid blazer and brown chinos.


I am looking forward to seeing future AVEN collections from Angie and Mitch and will continue to stalk the website and gawk at the photography and the styling of the little guys featured. So cool. (Look at the hair!)


DIY Appliqued Dream BIG Tee

Wednesday, April 25, 2012
I wanted to make an updated version of my original dream BIG tee for the boys (this is a great design for girls too). The previous font I used was when I was on a big circus kick. This time around, I wanted to update the font to something a little more modern and clean. I love how it turned out and apparently, Oliver does too.


The technique for this is very similar to my appliqued love tutorial - just a bit more involved and time consuming since there are more letters.  

What you'll need:
Blank t-shirt, one piece, or tank (pre-washed)
Felt or fabric piece for the applique (I prefer to use eco-fi felt by Kunin - it holds up great in the wash)
  Embroidery floss and needle
Scissors (small scissors with a pointy tip work best)
Fusible webbing
  Template for the applique (download here). Adjust the size of your template as needed. If you're intimidated with the detailed lettering, blow it up a bit - that will make it easier.


Since I use Heat n Bond, my instructions will follow Heat n Bond's instructions. If you are using a different fusible web, simply change out my instructions with the instructions on the package. If you have any questions, don't hesitate to contact me and I can help you. 

Getting Started:

The first thing you'll want to do is take the template and place it under a sheet of your fusible webbing. Take your pencil and trace "dream big" on to the webbing. With the "dream," I made the lines connecting the letters together slightly bigger when I traced so it would be easier for stitching. Any time you applique letters or numbers, you'll want to trace them in the reverse since you will flip them when you adhere them to your garment.


Next you'll want to iron your webbing onto your felt or fabric. For Heat n Bond, set it on the "wool" setting (NO STEAM). Iron the design onto the felt or fabric for about 3 or so seconds so it looks like this:


Carefully cut the appliques out. This applique is a bit detailed so having small, pointy tip scissors will come in handy here.  I use the micro-tip scissors from Fiskars and they work great.


Place the appliques exactly where you want them on the t-shirt with the glossy/fusible webbing side face down. Iron the applique on to the t-shirt pressing for about 10 seconds. I ironed "dream" first and then BIG second. Again be sure to use the wool setting with no steam. Check to be sure that the appliques are firmly adhered to the shirt.


Now that your appliques are attached to the t-shirt, you're ready to start the applique process. To stitch by hand, cut about 3-4 feet of your embroidery thread. Your skein of thread will have six strands. Separate two of the strands from the piece you've cut and thread them through your needle.
For this t-shirt, I use a straight stitch. It's a basic stitch and great for a beginner. You basically bring the needle up through the t-shirt and back down making straight little stitches about a 2 cm in from the edge of your applique.


A great video tutorial for the straight stitch is available here. The nice thing about sewing coordinating thread (floss) on felt or fabric is that it's hard to see so it's very forgiving if you're a beginning stitcher. If you're an experienced hand stitcher, it is fun to experiment with contrasting threads and different stitches.

Once you have finished stitching all of the appliques, you are finished. You could play around with different colors or even create your own design using different fonts.


If you get stuck or have any questions, please let me know.


DIY Chevron Stripes for Summer

Monday, April 23, 2012
I was looking through old photos from my Finley and Oliver line last night and came across the pictures from our super FUN summer shoot with Laura Winslow Photography. Sherri from Noah and Lilah and I worked on a collection together and Laura captured it magically. Some of my favorites from the shoot are of my friend's daughter in a navy tank with white chevron stripes.


Admittedly, I haven't embraced the chevron trend quite as much as others (you know who you are), but I do love the clean, modern aesthetic of the design and think it dresses up an otherwise plain tank or tee perfectly.


You can easily make your own little (or big - I made one for myself over at Sewing in No Man's Land) chevron tank for summer by following the exact instructions from my chevron onesie tutorial here.


View the entire shoot over at Laura Winslow Photography. So magical, so fun, you will love it.


Instructions to make your own chevron tank or tee here.

(If anyone would be interested in a tutorial on making the feather crown seen in these photos, let me know. It was so much fun to make and I love to share if anyone would like me to.)

What He Wore: BOY style

Friday, April 20, 2012

I'm a little late posting this week but I am super stoked to bring back our dear buddy, Jack. Jack (and his mom) know how to rock some serious style. This kid has a closet full of some of the coolest clothes and accessories. I always love seeing Jack and adore what his mom puts together when she photographs him.


Seriously. How cool is this guy?


Thanks to Laura Winslow Photography for the photos and to Jack for his rad style!

T-shirt: Oh Fiddlesticks (one of my FAVE t-shirt brands ever)
Jeans: Gap
Hat: Gap
Boots: Aigle
Sunglasses: Target

If you'd like to show off your little man's style, email me at finleyandoliver@gmail.com.

DIY Star Wars Freezer Paper Stencil T-shirt

Wednesday, April 18, 2012

I've received several questions about Oliver's Darth Vader freezer paper stencil t-shirt from this BOY style post.  That tee is a huge hit with my boys so I figured I'd better make another one so they don't come to blows over it. We decided on a storm trooper this time around.


What You'll Need:

Blank t-shirt or one piece (pre-washed)
Fabric paint - I used black fabric paint by Tulip
Paint brush - I used a fabric paint brush by Tulip
Freezer paper - available at most super markets
Exacto knife or small pointy scissors
Pen
Stencil template - I got the Star Wars templates here


Getting Started:

You can do one of two things with the template. Either print it out and place it under your freezer paper (wax side down - paper side up) to trace it. Or you can cut an 8 1/2 x 11 piece of freezer paper and print out the template directly on to it. My printer is somewhat sketchy so I chose to trace the stencil. A few of the lines were super thin so drew them slightly wider so they'd be easier to cut.


With your exacto knife or small pointy scissors, cut the stencil out. If you use an exacto knife, be sure to lay down some cardboard or a cutting mat to protect your work surface. The Star Wars stencils are pretty intricate and took me forever to cut with my scissors. If I was able to find my exacto knife (and had taken a little more time), the cuts would have been much easier (and neater). However, the finished product looks fine. Only the ultimate Star Wars geek might notice the discrepancies.

With the wax side down, use an iron to affix your stencil to the t-shirt.


Now it's time to paint the stencil. Place a piece of cardboard in the middle of your t-shirt so the paint doesn't soak through to the back side. With your paint brush, apply a thin, even layer over the stencil with short brush strokes. You don't want it too thick but you want to be sure it's applied evenly and covers the entire stencil.


Once you've finished painting, wait for the paint to dry completely. You can use a blow dryer to speed things along if you're impatient like me. Again, be sure it's completely dry and then carefully lift the stencil up. With a scrap piece of fabric on top of the stencil to be safe, iron for a few seconds to set the paint.


Voila! Finished. These are really easy to care for. I've washed the Darth Vader tee (machine wash cold/tumble dry low) at least 20 times and the paint is holding up brilliantly.


If you get stuck or have any questions, let me know.