What He Wore: BOY style

Wednesday, March 28, 2012

Poor Oliver is sick (for the 1021st time since school started last August). I took him to the doctor this morning and he looked so flipping cute in his new red pants that we took a little detour on the way home to snap some pictures for BOY style. The little guy wasn't feeling it so we cut it short pretty quick.


He got to pick out a sticker at the doctor's office and he thought the coolest place to display it was the bottom of his shoe. 


I love these little red pants that we picked up last week - we bought a green pair too. H&M has them in several different colors for just $10. I should have bought a size smaller because I like a slimmer fit for the boys but he'll grow into them.


Long sleeved tee: American Apparel
Blue tee: American Living (this was a gift not sure where it was purchased)
Pants: H&M
Flip Flops: Target

Want to show off your little man's BOY style on Finley and Oliver? Email me at finleyandoliver@gmail.com.

DIY Felt Bunny Ears

Monday, March 26, 2012
I know you can buy bunny ears at the dollar store or Target for super cheap. But honestly, they aren't nearly as cute as these that you can make yourself. Bust out your own pair of ears for just a few dollars and little bit of time.


What you'll need:

Felt in two different colors (I used wool felt but you can easily use eco-fi felt too)
Thin plastic headband (bought mine at the local drug store)
Wire
Sewing machine *or* embroidery floss and needle
Bunny ear template


Getting Started:

Cut out the bunny ear templates. Pin them to your felt and cut out. You'll need to cut two of the large ones per ear (four total for a headband) and one per ear of the little ones (two total for each headband).


Take the small pieces and pin them to the inside of one large piece. Make sure you pin them at least an inch up from the bottom .


Sew the small inner ear piece to the outer ear. You can either machine sew or hand stitch. I made one pair with my sewing machine and the other pair by hand stitching. Do this for both ears.


Take the other two large pieces and pin them to each of the ears. Machine sew or hand stitch them together. Be sure you DON'T sew the bottom of the ear (as indicated on the template). You need at least an inch at the bottom to wrap around the headband (indicated a few steps below) so keep it open.


Cut a 9" length of your wire. Honestly, I think that even pipe cleaners would probably work for this (although I haven't tried it). With pliers or scissors, make a loop/circle at the top of the wire so it won't poke through your ear.


Place your ear over headband. Then open end of your felt ear should hang over each side of the headband an inch or so.


Wrap the extra length of wire around the headband. It doesn't have to be perfect but it will help hold the ears up and in place.


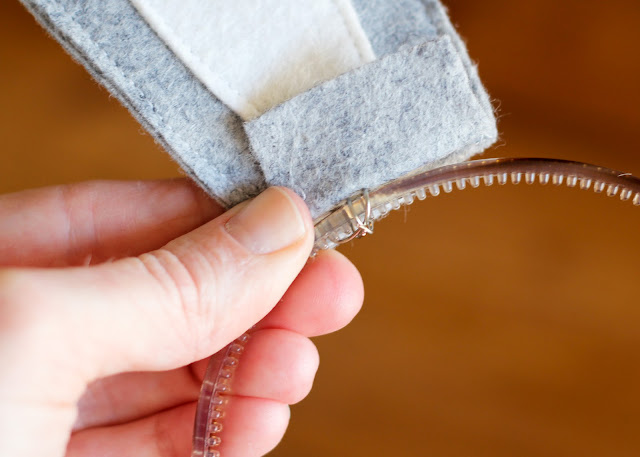
Now take the flap of felt in the back, fold it up and under the front flap. Sounds confusing but this picture should help. Easy peasy.


Take the remaining flap of felt in the front and wrap it under and around the headband. (If your flaps of felt aren't long enough to wrap around the headband, just take a seam ripper and rip up a few stitches on each side).


At this point, you can either hot glue the flap down or stitch it close with a needle and thread. I stitched it closed.

  
Do all of those steps from the wire on for the second ear and you're finished. This little project goes pretty quick. I made both pairs (one of them was hand stitched) in under 30 minutes. 


And just look how much the boys Finley loved his ears!


I don't blame Oliver for being miffed. What kind of mom makes a kid pose in bunny ears on his 4th birthday?? He eventually came around.


I don't know that I explained the steps very well (I'm kind of in a post 4 year old birthday haze) so feel free to message me or comment here if you get hung up on a step.

Blogging over at Sewing In No Man's Land

Thursday, March 22, 2012
March is {Sew for Me} month over at Sewing In No Man's Land and today I am showing everyone  how to make a super easy and cute chevron stripes applique top (it might look familiar to some of you.) Pop on over and check it out. Give yourself time to browse all of the other tutorials and guests that Kelly lined up for Sew for Me - some seriously amazing talent over there!


And totally off topic but I've dropped the ball on BOY style this week. I actually photographed Oliver yesterday but the weather, his pants, and my photos didn't all cooperate. Stay tuned for next week. He's got some new duds that we can't wait to share.

DIY LEGO Travel Box

Tuesday, March 20, 2012

A while back, my sister in law asked my mom to help her with a contest that her company was having. The requirements were to take a cheese box and transform it into something cool. I suggested my mom turn it into a LEGO travel case (something that we would LOVE and use all the time).


This is {kind of} a tutorial because I didn't document this with pictures. Sorry. However, it is crazy easy and I know that you guys are smart enough to take this and run with it.:)


What you'll need:
  • Wood box with sliding top - we used a cheese box and an old cigar box (some craft shops have similar boxes and several readers have suggested that wine shops and liquor stores have boxes perfect for this project)
  • LEGO building plate (this blue one is $4.99 - the two boxes we made are small so one plate covered both)
  • Strong glue
  • Spray paint


Steps:
  • Paint your box however you like (wait until completely dry)
  • Use scissors to cut your building plate to size
  • Glue the building plate to the top
  • Get your LEGO on! 
(As I mentioned before, the building plate we used was large enough to cover our two small boxes.)


 So easy and so fun. Perfect for trips, car rides, and playing at home.  We have yet to take these on a trip but the boys play with them all day long at home.


The only thing I'd like to add are handles. Maybe screw on a handle from a craft store? Leather? Rope?


I have a love/hate relationship with LEGOs (I know you can relate) and I'm hoping these will help with my sanity a bit - at least while traveling. If you whip one of these up, I'd love to see how it turns out!

3/26/12
One of my readers, Alicia, made a LEGO case for her 6 year old LEGO addict after reading this post. She used a flip top box from Hobby Lobby instead and it turned out great (in case you're having trouble sourcing a slide top box). I love how she added his initials (below).

The Goat Walk

Monday, March 19, 2012
We live in an agricultural neighborhood and have a few neighbors that raise goats. Each spring the cutest little goaties are born. We noticed a new pair of "kids" the other week and have been walking to see them each night.


They were a little camera shy at first (probably because the boys would go into fits of hysterics every time a goat peed, burped, etc.) so we spent our time feeding leaves to the older goats who seemed to be a bit more seasoned around crazy kids. They are so friendly and always run to the fence when they see us walking up.


They especially love the leaves from these orange trees that line their fence.
 

Now that we've been to see them several times (and I've convinced Finley and Oliver that you can't be all crazy around them), the little goats are getting more comfortable and venturing up to the fence to visit with us.


I can hardly stand the cuteness! Look at them!


The other day we went to visit them and noticed that there was a goat outside of the fence along the canal (we have flood irrigation so the homes in our neighborhood have canals that run along the back). We were worried that the goat escaped somehow but a neighbor came out to let us know that the owners put the goat out there occasionally to do some weeding along the canal. So rad. I wonder if I could borrow her?


We have toyed with the idea of getting goats for the past couple of years. We have the space and would love them for their weed control and milk production but have yet to work out the logistics... until then, we'll get our goat fix by visiting the little goaties down the road.


DIY Bunny Applique

Wednesday, March 14, 2012
I feel like I'm still recovering from the holidays yet Easter is just around the corner! I'm not sure I'll ever get caught up but I did manage to eek out this really cute and *super simple* bunny applique. I'm not a huge fan of pastels so I decided to keep with the spring trend and go for a hot pink bunny. Of course, you can do this in any color you like. (This would be cute for the little guys too!)


What you'll need:
  • Blank one piece, t-shirt, tank, etc. (pre-washed for shrinkage)
  • Sheet of felt or piece of fabric in the color(s) of your choice - if you're using felt, I strongly recommend eco-fi felt by Kunin. It's made from recycled bottles and holds up really well in the wash.
  • Heat n Bond or other fusible webbing (if you plan to machine sew the applique, be sure to use Heat n Bond Lite)
  • Scissors
  • Sewing machine *or* embroidery floss and needle
  • Bunny template


Getting Started:

Since I use Heat n Bond, my instructions will follow Heat n Bond's instructions. If you are using a different fusible web, simply change out my instructions with the instructions on the package.
Print out your template and place it under your fusible webbing. Trace the pattern with a pencil. 

Next you'll want to iron your bunny webbing onto your felt or fabric. For Heat n Bond, set it on the "wool" setting (NO STEAM). Iron the design onto the felt or fabric for about 3 or so seconds so it looks like this:


Carefully cut out your bunny.


Take your bunny and peel off the wax paper layer from the back. Place the bunny exactly where you want it on the t-shirt with the glossy/fusible webbing side face down. Iron the applique on to the t-shirt pressing for about 10 seconds. I like to place a scrap piece of fabric over the applique while pressing just to be safe. Again be sure to use the wool setting with no steam. Check to be sure that the applique is firmly adhered to the shirt.


Now that your bunny is attached to the t-shirt, you're ready to start the applique process. You can do this with a machine or by hand. To stitch by hand, cut about 3-4 feet of your embroidery thread. Your skein of thread will have six strands. Separate two of the strands from the piece you've cut and thread them through your needle.

For this piece, I used a straight stitch. It's a basic stitch and great for a beginner. You basically bring the needle up through the t-shirt and back down making straight little stitches about 2 cm in from the edge of your applique.


Once you've finished the stitching, you're finished.


This little number won't take you long at all. Maybe 30 minutes or so depending on how long the stitching takes. It's well worth the effort when it can make your kid *this* happy!